It's the only PDF viewer available*, which is able to open and interact with all types of PDF content, including forms and multimedia. Sharing your work is no longer a chore with Adobe Acrobat Reader DC for Mac. The app allows you to share documents with others in a variety of ways. Adobe Acrobat Not Opening? As the inventors of PDF file format, Adobe has a fairly good understanding of how to improve the user's experience when Uninstall Adobe Acrobat and then run the Acrobat Cleaner Tool on a Windows PC or CSCleaner Tool for Mac. This will remove every bit of. Just tried to install Acrobat Reader DC for Mac. The app will not open PDF files - it crashes repeatedly and simply will NOT open any PDF file. When moving the PDF files over another computer (the laptop in question) the Acrobat Reader will simply crash upon opening.  Unfortunately, Acrobat/Reader on Mac OS does not come with the repair option the the Windows version has, and Adobe also does not have the Cleaner tool that they offer I just had the same thing happen with Adobe DC on my MacBook Pro- no PDFs will open. I tried uninstalling and reinstalling.
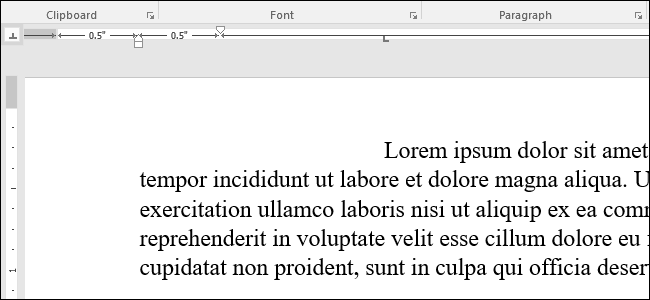
Document formatting can be a point of contention for many companies, schools, and publications, so knowing how to set up your documents to match those requirements is important knowledge to have. One common formatting requirement is related to the document margins, and a popular choice is to set all of the document margins at 1 inch.
Fortunately all versions of Microsoft Word allow you to manually adjust your margins to 1 inch, including Word 2011 for Mac. Our guide below will show you where to find this setting in the program so that you can switch the margins to 1 inch.

Use 1 Inch Margins in Word 2011 for Mac The steps in this article will show you how to use 1 inch margins for a document that you create using Microsoft Word 2011 for Mac. Microsoft project 2013 free download for mac. You can also using a similar method. If you wish to adjust the default margins for any document that you create in Word 2011, then check out our tip at the end of this article. • Open your document in Word 2011 for Mac. • Click the Layout tab at the top of the window. • Click the Margins button, then click the Normal option at the top of the list of options. You can also choose to manually set the margin values by clicking inside each of the margin fields and changing the value to 1.
Have a large image to print and need to adjust the margins to fit it on a printed page? Here's easy to follow instructions for Custom Page Sizes on Mac OS X. To begin, click ⌘P, or go to File -> Page Setup (in Firefox) or File -> Print (Safari.
Note that following these steps will only change the margins to 1 inch for the current document. If you wish to change the default margins to 1 inch in Word 2011, then you will need to click Format > Document at the top of the screen, then adjust the margins and click the Default button at the bottom-left corner of the window. Do you need to share your Word document with someone that does not have Microsoft Word installed on their computer? And make it easier for more people to open your document.